Restore your hosting account data from backups
Data restores enable a rollback of a data point (such as website files, database, email, etc.) to an earlier state, providing recovery in scenarios of accidental deletion or errors.
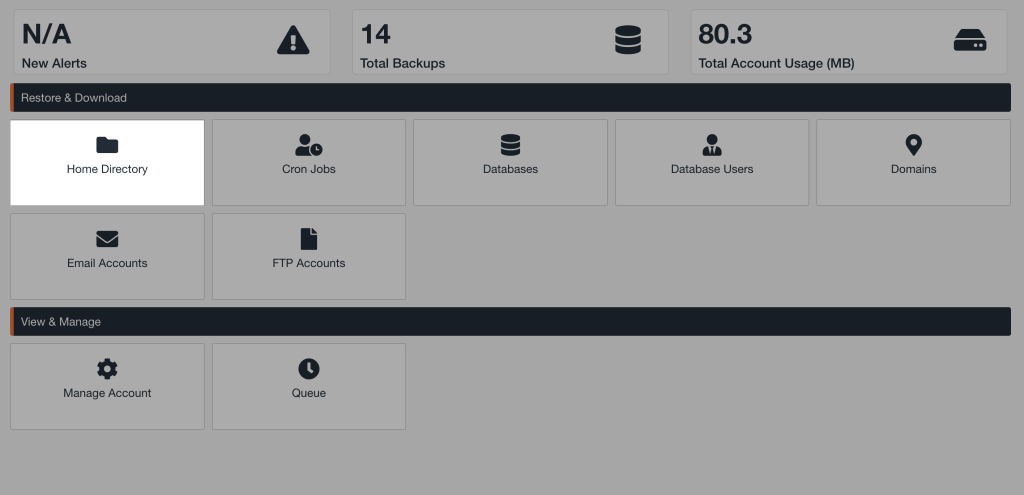
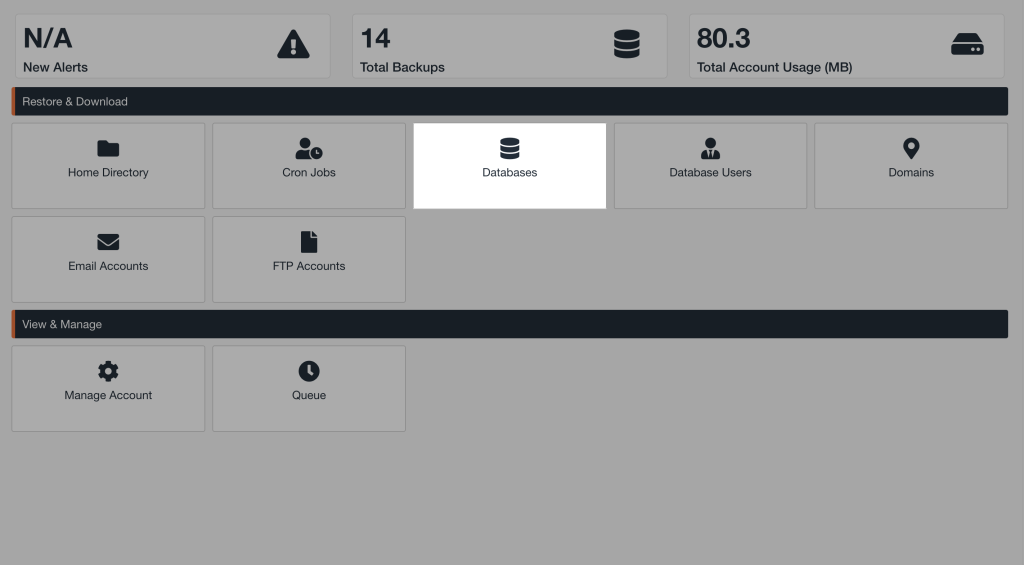
You can restore your hosting account data using the JetBackup tool available on your hosting control panel.
⚠️ Important: You will only see JetBackup on your hosting control panel if you have daily backups active on your hosting subscription. If you don’t see it, click here to get the daily backup service activated.
⚠️ Experiencing errors on your website? A data restore might be the ideal fix. Begin by restoring website files, and if the issue persists, proceed to restore the database.
⚠️ Note: JetBackup stores backups over a 14-day version history with timestamps in EST (Eastern Standard Time).
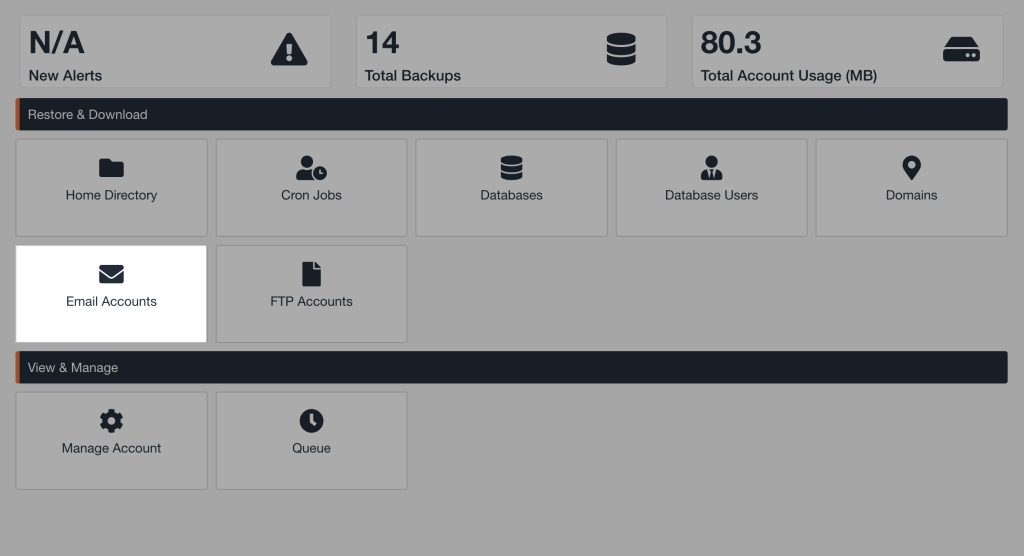
The following data points are available for data restoration from backups using the JetBackup tool:
- Home Directory (website files, app files, etc.)
- Databases
- Database users
- Email accounts
- DNS zones
- FTP accounts
- Cron jobs
In this guide, you will find specific steps to restore your website files, databases, and email accounts as these are the most common data restore types. If required, you can also use the same logic of steps to restore other data points.
Restore website files
Use the steps below to restore website files or any files located in your home directory.
1. Log in to your hosting control panel
2. Click on the JetBackup button

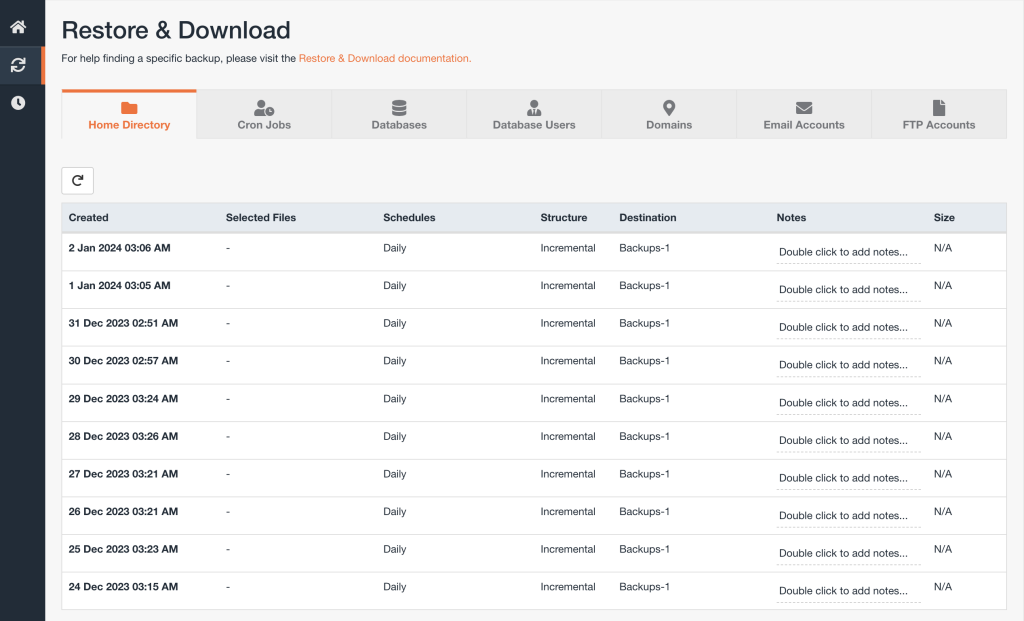
3. Click on the Home Directory square
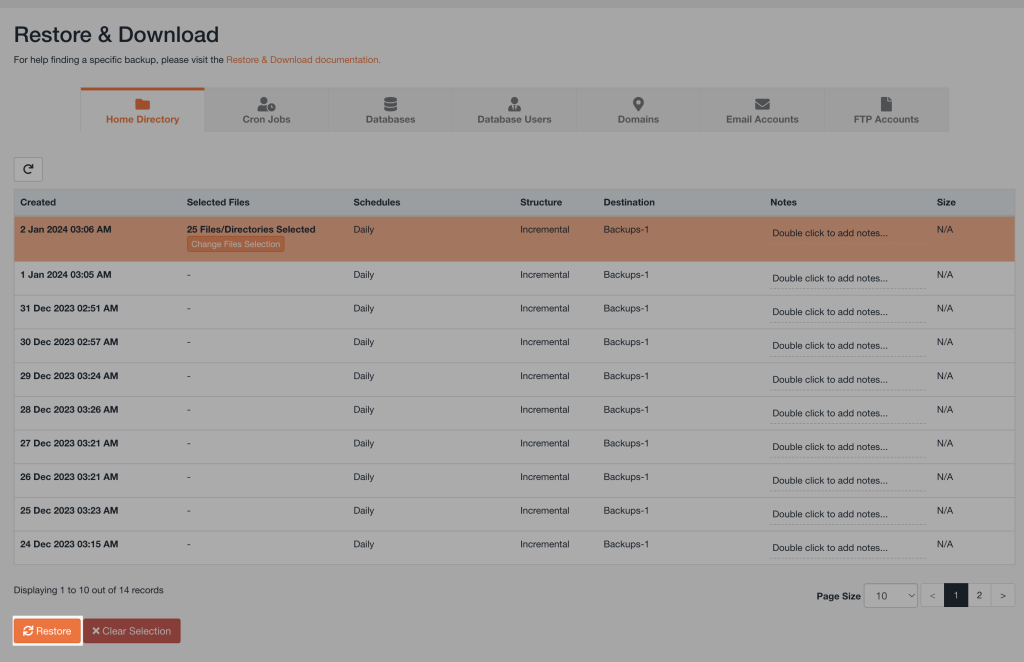
4. On the Restore & Download page, you will see a list of dates. Each listed date represents a recovery point, which is a snapshot of your data from that date and time. Timestamps are in EST (Eastern Standard Time). Click directly on the date you want to recover the website file data from.
⚠️ Note: JetBackup stores backups over a 14-day version history with timestamps in EST (Eastern Standard Time).
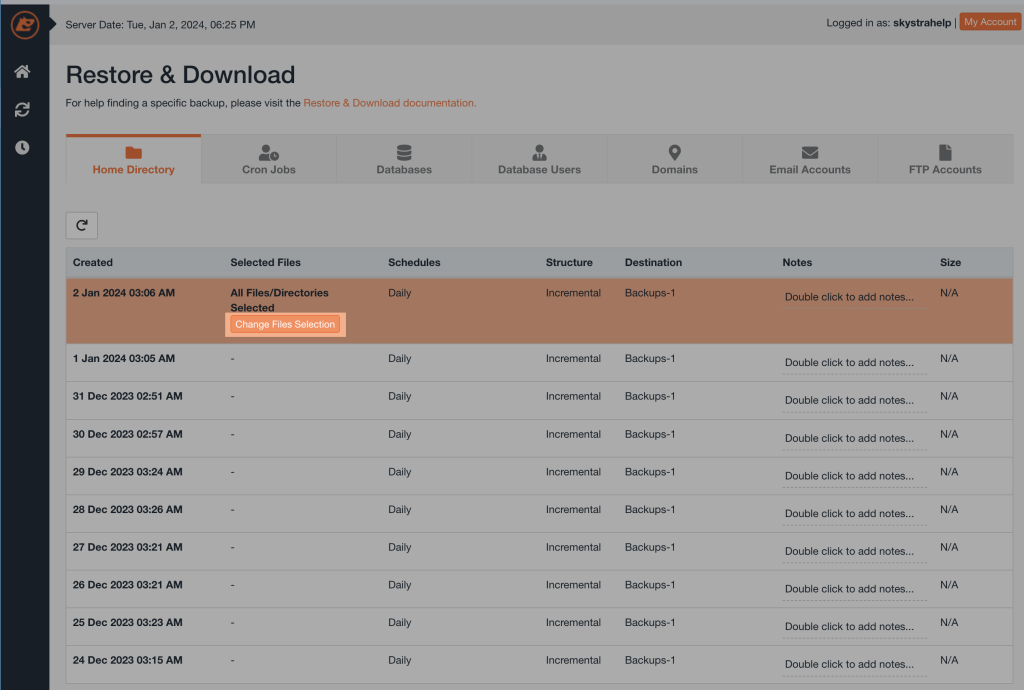
5. Once you click on a date, it will highlight and you will see a Change Files Selection button appear. Click on the Change Files Selection button.
6. On the Select files popup, click the down arrow next to Page Size at the bottom-right and select 100
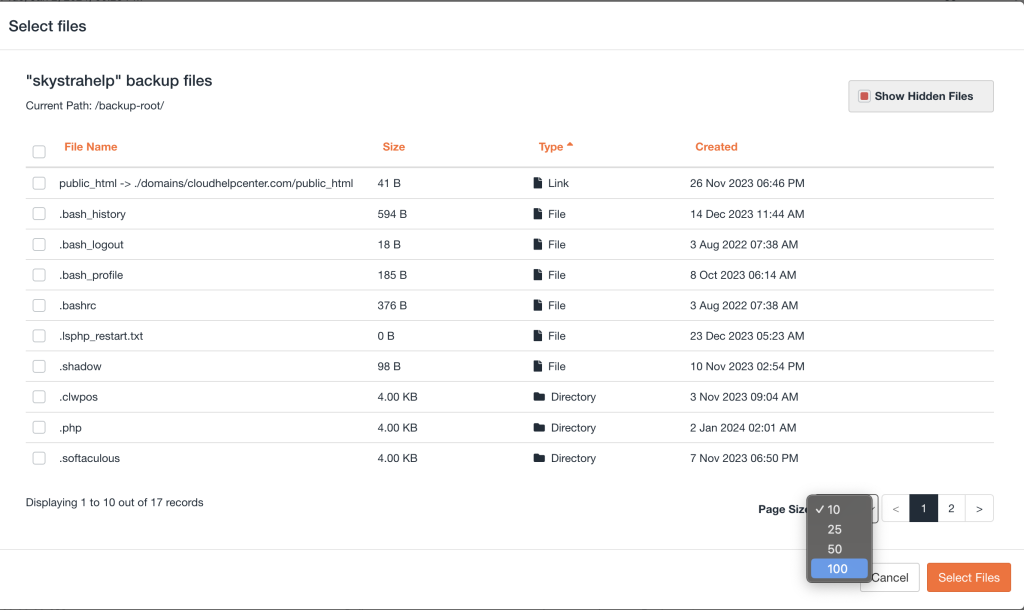
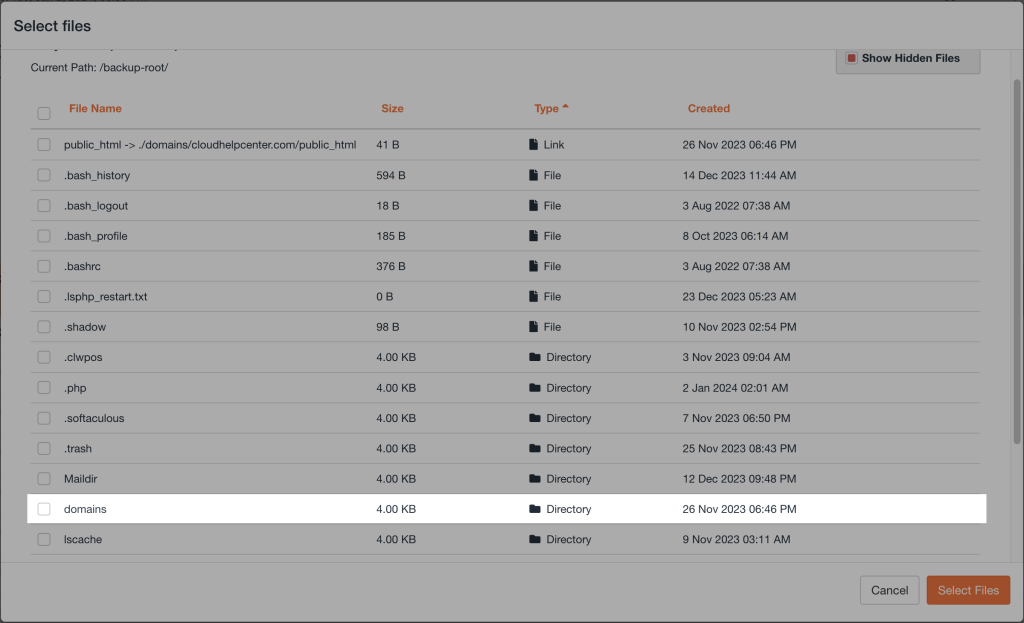
7. Find the domains folder under File Name, you may need to scroll to find it. Once found, click directly on it.
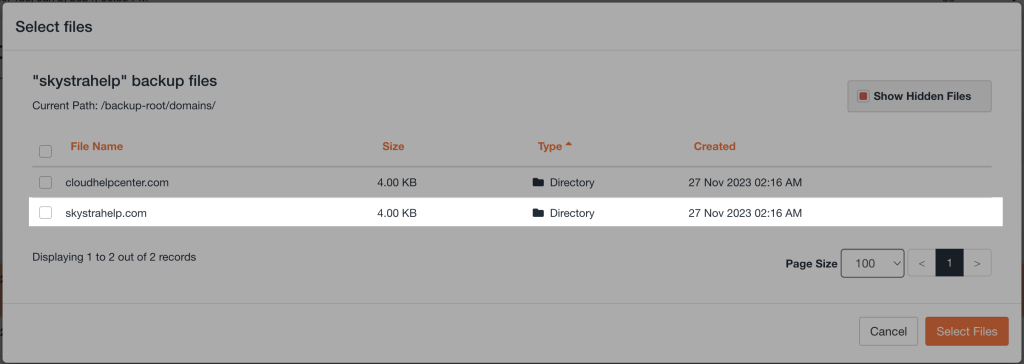
8. On the next screen, find the domain name of the website (or app) you want to restore files for under File Name. If you have several websites, you may need to scroll. Once you find your website domain name, click directly on it.
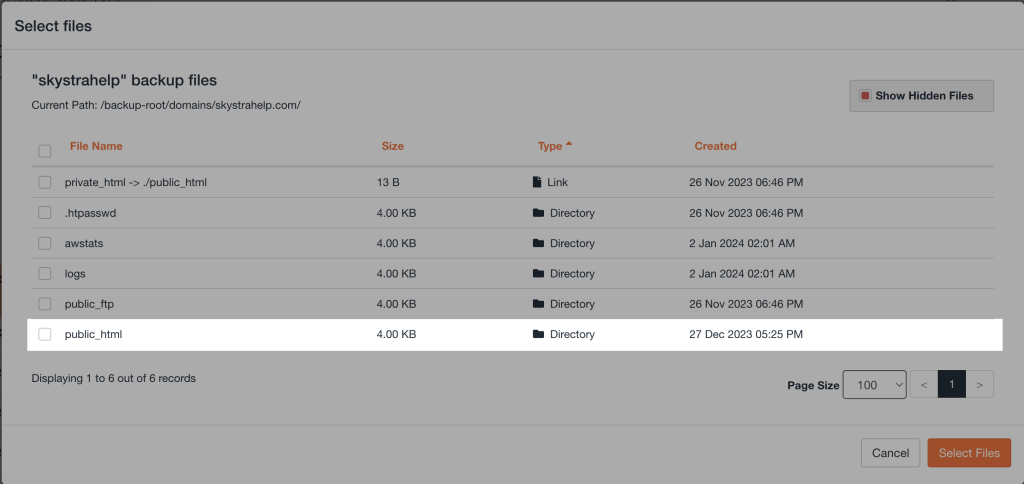
9. In your website domain name folder, click directly on public_html
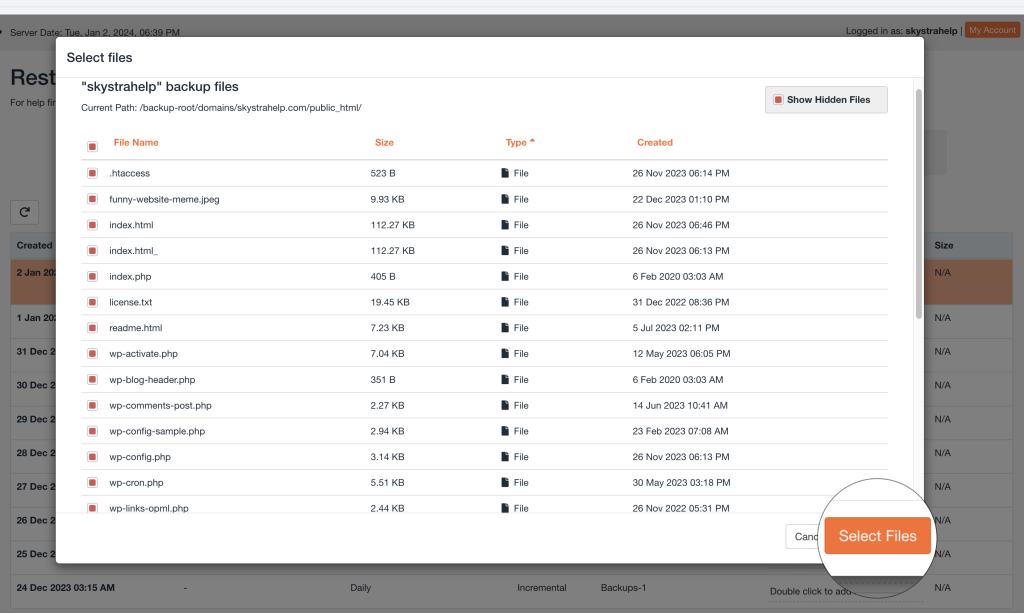
10. The public_html folder contains all of your website files. From here, check the box next to the file(s) you want to restore. To restore all the website files, check the box next to each one. Once checked off, click the Select Files button.
11. The Select files popup will now close. On the Restore & Download page, click on the Restore button.
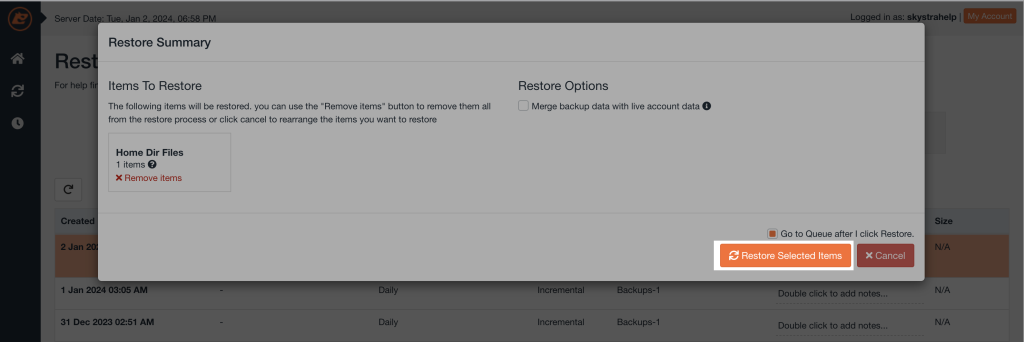
12. You will then get a Restore Summary popup to confirm your restore selection. If you want to make any changes, click on X Remove Items inside the Home Dir Files square to make changes. To continue with the selection, click on the Restore Selected Items button to start the data restore process.
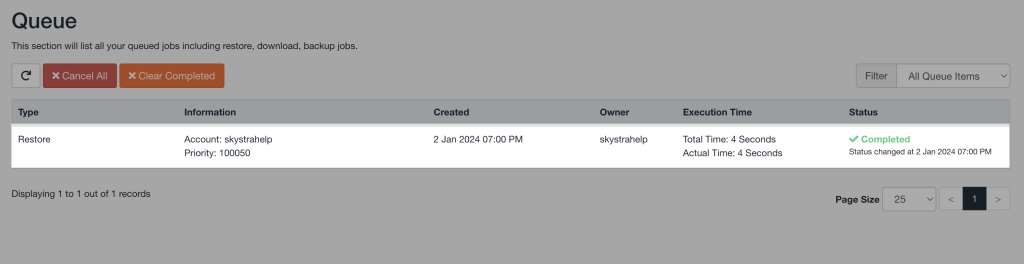
13. The restoration process will then be added to the queue and may take some time, depending on the size of the data being restored. You will be able to monitor the progress on the same page. Once the restoration is complete, you will see a ✓ Completed message and a time stamp.
Restore database(s)
Use the steps below to restore a database.
1. Open and complete all of the steps in this guide: View WordPress website database name
2. Once you’ve located your database name, take note of it somewhere secure
3. Go to your hosting control panel main page
4. Click on the JetBackup button
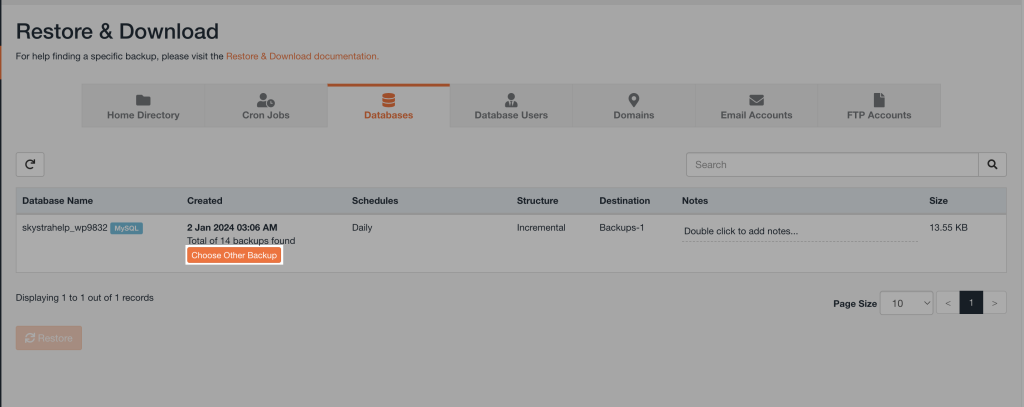
5. Click on the Databases square
6. On the Restore & Download page, you will see a list of your databases. Find the name of the database you want to restore and click the Choose Other Backup button. If you have many databases, you may have to go to the next page or increase the Page Size view length.
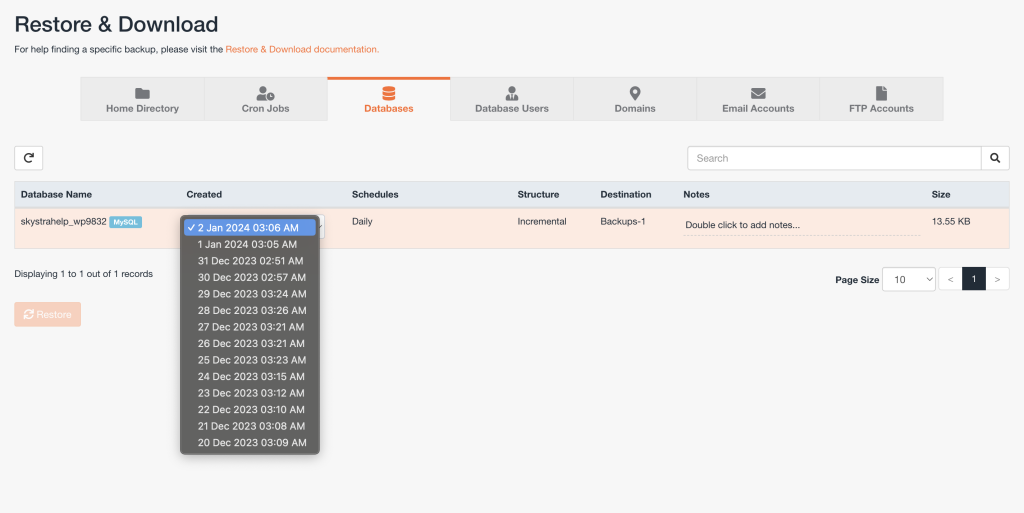
7. From the dropdown, you will see a list of dates and times. Each listed date represents a data recovery point, which is a snapshot of your data from that date and time. Timestamps are in EST (Eastern Standard Time). Click directly on the date you want to recover the database from.
⚠️ Note: JetBackup stores backups over a 14-day version history with timestamps in EST (Eastern Standard Time).
8. Once you click on a date, you will see it selected. Now, click directly on your database name. Once clicked, it will highlight.
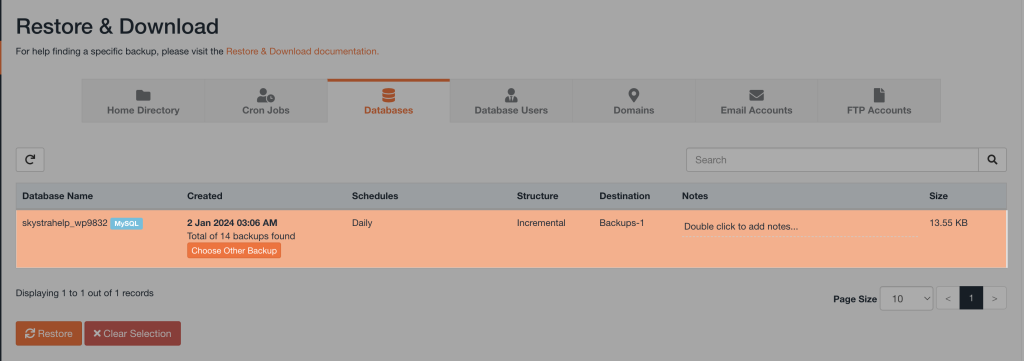
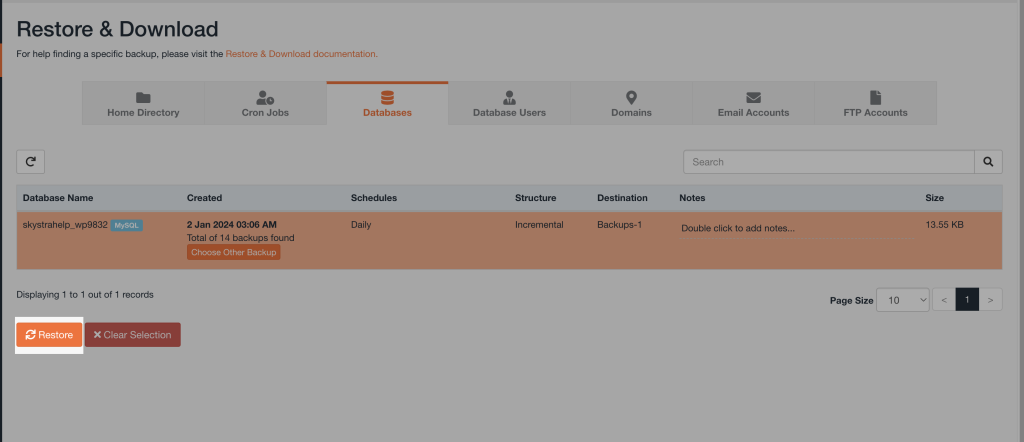
9. Perform a double-check of your database name and date selection. To continue with the selection, click the Restore button.
10. You will then get a Restore Summary popup to confirm your restore selection. If you want to make any changes, click on X Remove Items inside the Databases square to make changes. To continue with the selection, click on the Restore Selected Items button to start the data restore process.
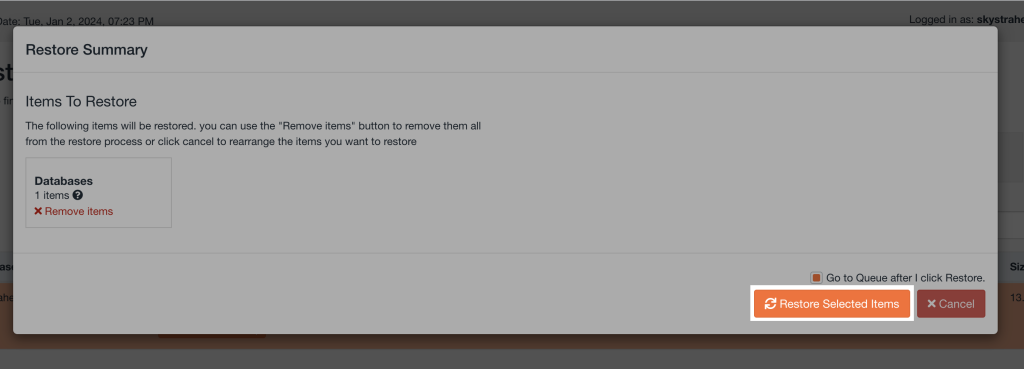
11. The restoration process will then be added to the queue and may take some time, depending on the size of the data being restored. You will be able to monitor the progress on the same page. Once the restoration is complete, you will see a ✓ Completed message and a time stamp.
Restore email account(s)
Use the steps below to restore an email account.
1. Log in to your hosting control panel
2. Click on the JetBackup button
3. Click on the Email Accounts square
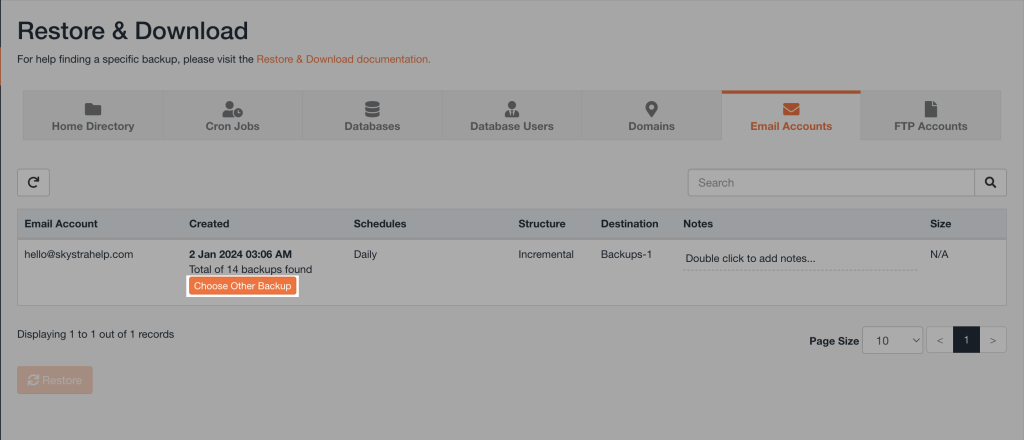
4. On the Restore & Download page, you will see a list of your email accounts. Find the name of the email account you want to restore and click the Choose Other Backup button. If you have many email accounts, you may have to go to the next page or increase the Page Size view length.
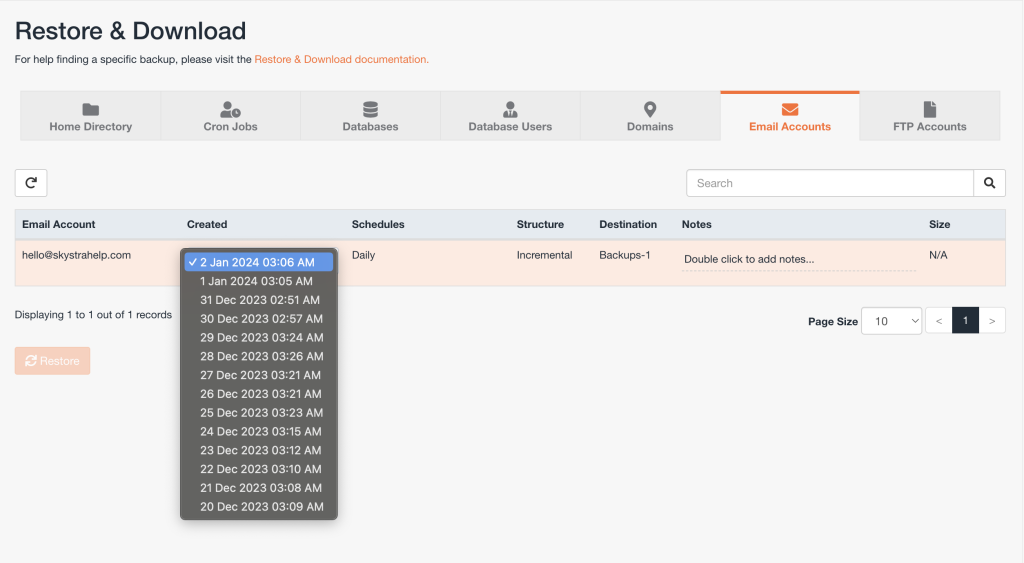
5. From the dropdown, you will see a list of dates and times. Each listed date represents a data recovery point, which is a snapshot of your data from that date and time. Timestamps are in EST (Eastern Standard Time). Click directly on the date you want to recover the email account from.
⚠️ Note: JetBackup stores backups over a 14-day version history with timestamps in EST (Eastern Standard Time).
6. Once you click on a date, you will see it selected. Now, click directly on your email account name. Once clicked, it will highlight.
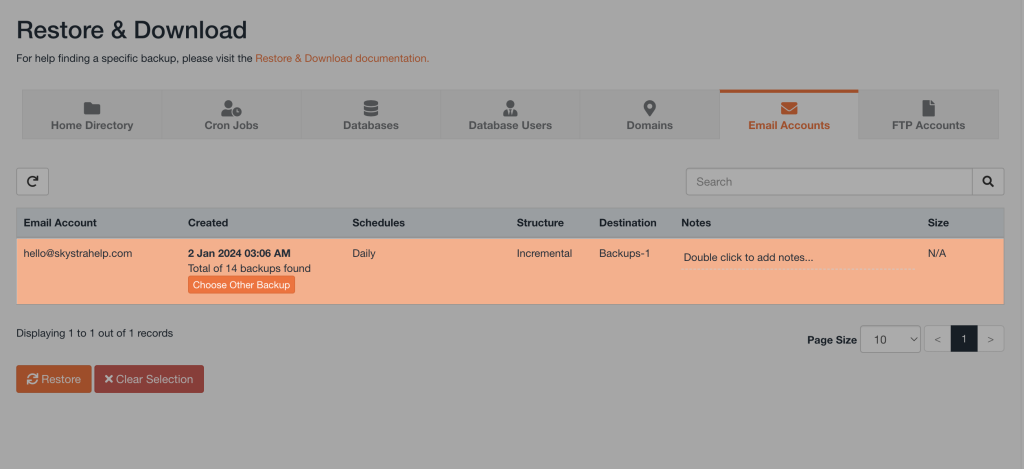
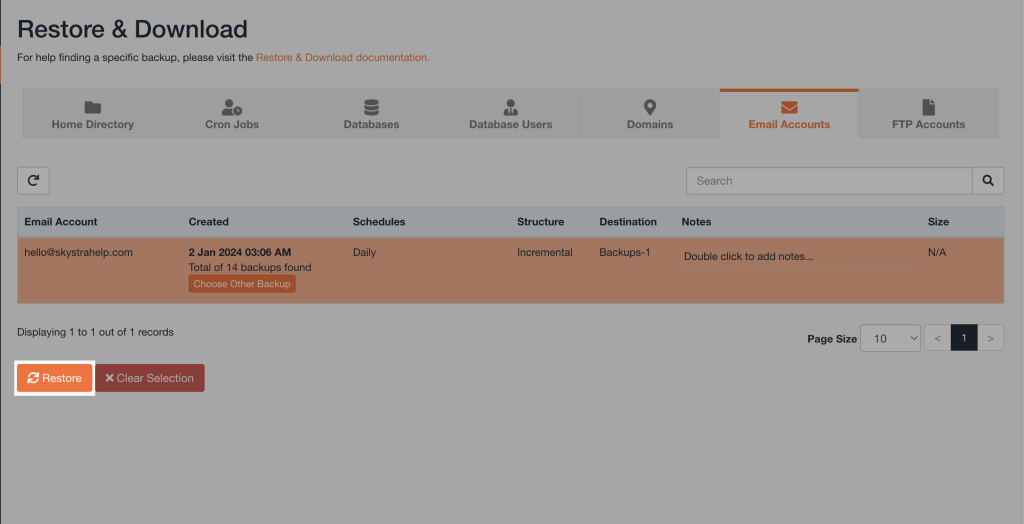
7. Perform a double-check of your email account name and date selection. To continue with the selection, click the Restore button.
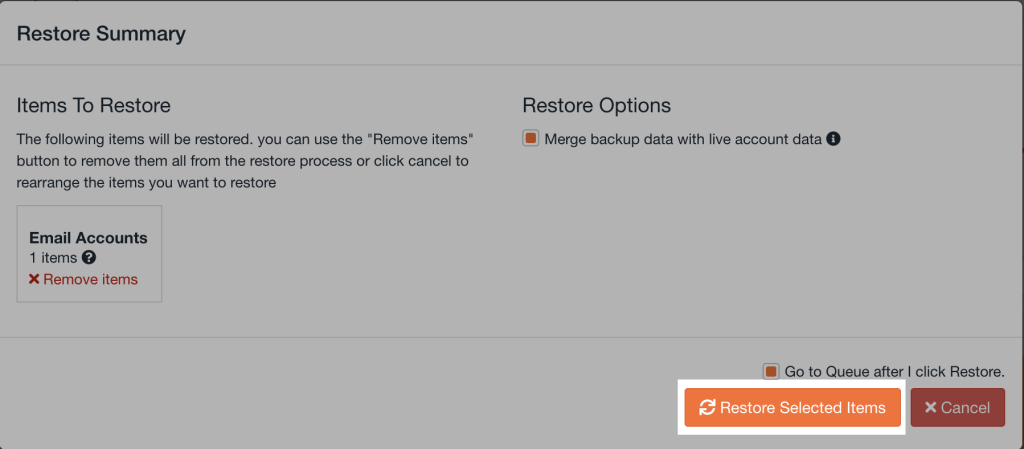
8. You will then get a Restore Summary popup to confirm your restore selection. If you want to make any changes, click on X Remove Items inside the Email Accounts square to make changes. To continue, under Restore Options, check the box next to Merge backup data with live account data. Then, click the Restore Selected Items button to start the data restore process.
⚠️ Important: Under Restore Options, make sure to check the box next to Merge backup data with live account data to preserve your existing email data and merge it with the restored data.

9. The restoration process will then be added to the queue and may take some time, depending on the size of the data being restored. You will be able to monitor the progress on the same page. Once the restoration is complete, you will see a ✓ Completed message and a time stamp.